This same tradition has been carried on in custom development as well, bringing up smiles to the faces of tech enthusiasts. Once you have unlocked the device’s bootloader via In-Depth Test APK, there’s a truckload of tweaks to try out. From flashing custom ROMs to installing custom recoveries like TWRP or OrangeFox, the possibilities stand endless. Along the same lines, you could even root your device via Magisk, with or without using TWRP Recovery. But this is just one aspect. As every coin has two sides, the same is the case here as well. On one hand, these tweaks end up adding more functionalities to your device. On the other side though, you could invite risks if you don’t perform the steps correctly or flash an incorrect binary. All this would lead to a bricked or boot-looped device. But fret not. Even if that happens, there’s a handy way out. This guide will show you the steps to unbrick the Realme X2 and X2 Pro devices via Fastboot Commands.
How to Unbrick Realme X2/X2 Pro via Fastboot Commands
The below instructions are listed out under separate sections for ease of understanding. Make sure to follow in the exact same sequence as mentioned. Furthermore, you could also use these instructions if you are just looking to flash the stock firmware manually onto your ‘working device’ via Fastboot Commands. But in that case, make sure to unlock the device’s bootloader as well. With that said, let’s now turn our attention towards the instructions to unbrick your Realme X2/X2 Pro device via Fastboot Commands. Droidwin and its members wouldn’t be held responsible in case of a thermonuclear war, your alarm doesn’t wake you up, or if anything happens to your device and data by performing the below steps.
Fix Realme Bootloader Unlock Failed to Submit ApplicationHow to Extract OZIP Realme Stock ROM (Firmware)Flash OFP File in Realme Devices using Realme Flash ToolHow to Boot Realme Devices to EDL Mode (3 Methods) | Unbrick It
Install Android SDK
First and foremost, you will have to install the Android SDK Platform Tools on your PC. This is the official ADB and Fastboot binary provided by Google and is the only recommended one. So download it and then extract it to any convenient location on your PC. Doing so will give you the platform tools folder, which will be used throughout this guide.
Boot Bricked Realme X2/X2 Pro to Fastboot Mode
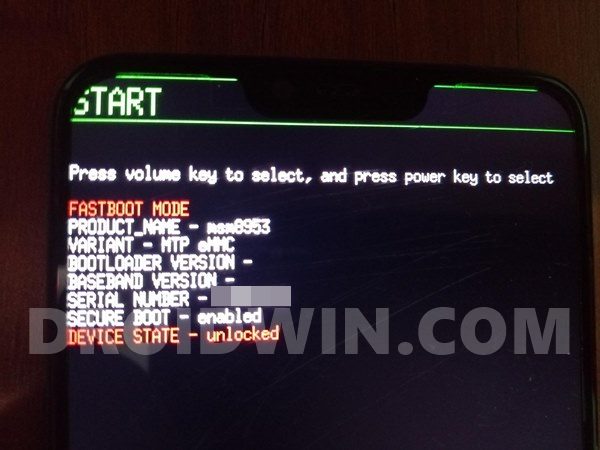
Since your device is in a bootloop/soft-brick state, you cannot use the adb reboot bootloader command. Hence you will have to opt for the hardware key combinations. Here’s how it could be done:
Download Realme X2/X2 Pro Fastboot ROM
Realme provides the firmware files in OZIP format. The issue with this format is that you cannot directly flash it via Fastboot Commands. For that, you will first have to convert this OZIP firmware to Fastboot Images format so as to make it eligible for flashing. Fortunately, XDA Recognized Developer acervenky has already done this task.
He has uploaded the firmware for both these devices belonging to different regions. So if your device belongs to this region and more importantly it matches the firmware version currently installed on your device, then you could directly pick up the Fastboot ROM file from above. However, if it’s a different firmware build, then you will have to manually convert this OZIP to Fastboot ROM. For that, please refer to our guide to Extract Fastboot Images from Realme/Oppo OZIP Firmware.
Transfer Realme X2/X2 Pro Fastboot ROM to ADB Folder
Once you have got hold of the Fastboot ROM file, transfer its content to the platform-tools folder on your PC. Make sure you transfer all the four IMG files, i.e. boot.img, system.img, vbmeta.img, and vendor.img.
Open CMD Window inside ADB
Flash Realme X2/X2 Pro Stock ROM via Fastboot Commands and Unbrick It
It’s now time to flash all these four files to the Realme X2/X2 Pro respective partitions and hence unbrick it. So type in the following commands in the CMD window that is opened inside the platform-tools folder: That’s it. This wall all from this guide to unbrick Realme X2/X2 Pro via Fastboot Commands. If you have any queries concerning the aforementioned steps, do let us know in the comments. We will get back to you with a solution at the earliest.
About Chief Editor


