Well, the thing is up until now, you musty have rooted the device via TWRP. In that, we only have to flash the Magisk ZIP file, and in some cases Disable DM Verity. But apart from that, nothing else. However, with Pixel devices launched with Android 10 out of the box, things have got a little sour, and hence you cannot root your device via TWRP. So in this guide will show you how to root your device via Magisk itself, without the TWRP Recovery.
Why Choose the Non-TWRP Root Method For Pixel 4A
A question might arise as to why one should go for this method. Well, the point is that with Android 10, things have gone south with custom recoveries like TWRP. There has been quite a few ups and downs (more downs than ups to be frank) and it has resulted in quite a patchy relationship. With some massive changes to the ramdisk, developing TWRP is now an extremely tough job. So all the devices that comes with Android 10 out of the box suffers from this ‘limitation’. Here is what the TWRP Team has to say in this regard: As a result, it becomes pretty obvious that in the absence of the TWRP Recovery, you are only left with one method to root your Pixel 4A: using Magisk. And in this guide, we will be doing just that. So without further ado, let’s check out the steps. In the past, the executable binaries in the ramdisk were built as static binaries with no linked libraries. TWRP has almost always been built with separate linked libraries. The new dynamically linked stock ramdisk will make it harder for us to slip TWRP into the ramdisk. Normally TWRP leaves /system alone so that we can mount the system partition to its usual location of /system. If we leave things the way they are, mounting the system partition gets tricky.|
Prerequisites
STEP 1: Get a Stock Boot.Img File
The first step in this regard requires you to have a stock boot.img file from your current ROM/firmware. For that, you could head over to your respective firmware download page and download the firmware file which is currently installed on your device. Then extract the firmware and copy the boot.img file from there. If you can’t find the stock boot.img file, let us know your device name and the firmware version in the comments, we will share the same on Google Drive.
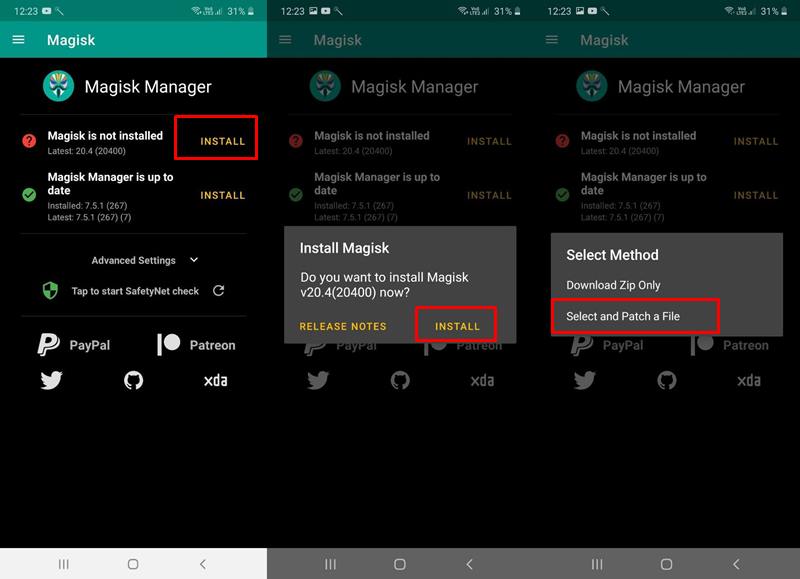
STEP 2: Patch the Stock Boot.Img File
Now that you have the stock boot.img file, transfer it to your device. Then follow the below steps. Or if you are new to all this, we would highly recommend going through our article on the said topic: Patch Stock Boot Image via Magisk and Flash it using Fastboot (just the first half).
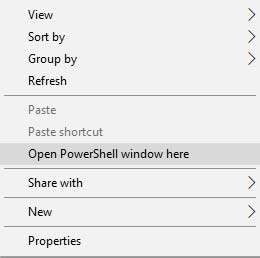
STEP 3: Temporary Boot the Patched Boot Image File
Now we will temporarily boot this patched boot.img file. Follow the below steps in the same manner as mentioned: After executing the above command, your device will reboot to Android System. Now you need to permanently install this patched boot file. Head over to the below section.
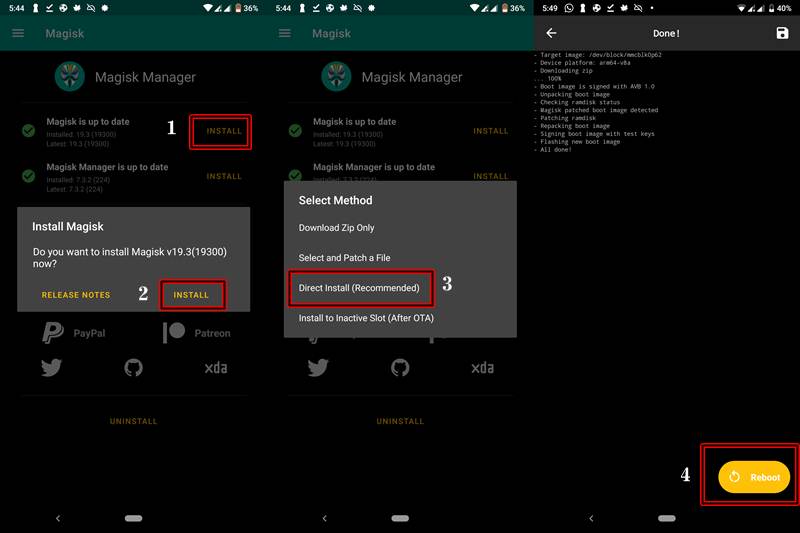
STEP 4: Permanently Install the Patched Boot Image File
Conclusion
So with this, we conclude the guide on how to root your Pixel 4A without TWRP Recovery. If you are stuck at any of the above steps, do drop in your queries in the comments below. Rounding off, here are some other rooting guides that you should check out:
[3 METHODS] How To Transfer or Install Files via TWRP RecoveryHow to Boot Any Android Device to TWRP RecoveryWhat is a Nandroid Backup? How to Create and Restore it Via TWRP
The credit for the Pixel 4A image in this aritcle’s Feature Image goes to @OnLeaks x A91Mobiles
About Chief Editor